MESA/binary
This lecture is focused on gaining a basic understanding of how the binary module works, and how to use it.
Stellar evolution is fun; with it, we can investigate a lot of aspects about stellar physics.
However, a lot of stars in the universe come with companions, so it is important to have some tools to simulate a star and its companion, simultaneously.
To this end, mesa/binary was conceived.
In short, mesa/binary’s responsibility is to make up to two stellar models communicate, by tracking the orbital angular momentum, the masses, and hence the period and separation.
Routines are implemented to simulate the transfer of mass between the components, as well as processes that affect the angular momentum budget, such as the emission of gravitational radiation.
The evolution of the stars themselves is still done within mesa/star, with its own set of settings that one is used from doing single star evolution.
the work directory
We start by navigating to $MESA_DIR/binary/work.
To see its contents, issue
tree -Cbinary has a slightly different work directory compared to a single star.
It has some extra files, like inlist1, inlist2 and src/run_binary_extras.f90.
inlists
inlist_project now has the sections &binary_job and &binary_controls.
These function similarly to &star_job and &controls for single stars.
In &binary_job, a user can specify high-level, unchanging options.
Most importantly, here you point to what inlists are used at the star level.
The new inlists contain the single-star options, and the typical structure of pointings is as follows:
inlist -> inlist_project (binary level) |-> inlist1 (star 1 options)
                                        |-> inlist2 (star 2 options)
in &binary_job, it looks like this:
&binary_job
   inlist_names(1) = 'inlist1'
   inlist_names(2) = 'inlist2'
/
also, the user will specify here if the companion is going to be evolved:
&binary_job
   evolve_both_stars = .true.
/
If .true., both stars will have corresponding mesa/star models computed, if .false., MESA will not evolve a model for that star, assuming a point mass instead, and so this implies the companion is most likely some sort of compact object such as a black hole.
In &binary_controls, the user specifies the initial state of the binary, as well as any options relating to mass transfer, angular momentum evolution, timestepping, and output.
In the Documentation, the Reference tab contains the list of all possible binary (job) controls.
run_binary_extras.f90
run_binary_extras.f90 contains hooks for users to input their own routines that pertain to binary evolution, such as specifying custom mass-transfer rates, custom angular momentum loss prescriptions, etc.
You can also define extra binary_history columns of custom quantities you want to track.
A key ingredient in doing things in run_binary_extras is the existence of the fortran structure binary_info.
It is essentially a container where we store all the information we need to keep track of the state of the binary, such as the orbital angular momentum, the masses of the components, the age of the system, etc.
You set up the usage of this in the same way as star_info.
Inside any routine, you write:
use binary_def, only : binary_info, binary_ptr
integer, intent(in) :: binary_id
integer, intent(out) :: ierr
type (binary_info), pointer :: b
ierr = 0
call binary_ptr(binary_id, b, ierr)
if (ierr /= 0) then
    write(*,*) 'failed in binary_ptr'
    return
end if
In this way, the binary pointer b is coupled to the info that way stored at index binary_id (you usually don’t have to worry about what exactly binary_id is, as it’s an input of most subroutines and hooks).
Now we can access any information the binary_info structure possesses:
my_period = b% period
my_primary_mass = b% m(1)
See $MESA_DIR/binary/public/binary_data.inc to see which properties are stored in binary_info.
control flow
Now that we have more properties to keep track of, and potentially two stars to evolve, we need a different control flow structure than what a single-star run provides.
The main file that achieves this is $MESA_DIR/binary/private/run_binary_support.f90.
Instead of just reading this code, we can explore the control flow by using some write statements at specific places in run_star_extras and run_binary_extras.
- First, make a copy of the standard binary work directory
$MESA_DIR/binary/workto a location of your choice (I called itfirst_binary). - Then, copy the contents of
$MESA_DIR/star/job/standard_run_star_extras.incintorun_star_extras.f90as a replacement of theincludestatement. - Then, in
start_step,check_modelandfinish_step, write your favoritewritestatements so you can tell which function is executing. - Do the same in
run_binary_extras.f90, write awritestatement inbinary_start_step,binary_check_model,binary_finish_step.
for example:
integer function extras_binary_start_step(binary_id,ierr)
   type (binary_info), pointer :: b
   integer, intent(in) :: binary_id
   integer, intent(out) :: ierr

   write(*, *) "doing binary_start_step"

   extras_binary_start_step = keep_going
   call binary_ptr(binary_id, b, ierr)
   if (ierr /= 0) then ! failure in  binary_ptr
      return
   end if
end function  extras_binary_start_step
and:
integer function extras_start_step(id)
   integer, intent(in) :: id
   integer :: ierr
   type (star_info), pointer :: s

   write(*, *) "doing star", id, "start_step"

   ierr = 0
   call star_ptr(id, s, ierr)
   if (ierr /= 0) return
   extras_start_step = 0
end function extras_start_step- Let’s compile and run this model (whatever it actually is) to see the order in which these functions trigger:
./mk
./rn
In case you encounter permission errors running
mesa, issue:chmod +x mkandchmod +x rn
Kill the process after a dozen or so steps with ^C (control-c).
The output should look somethinglike this.
 doing star           1 start_step
 doing binary_start_step
 doing star           1 check_model
          2   7.133759   5615.044  -0.152227  -0.152227   1.000000   1.000000   0.696983   0.004061   0.280000  -1.726624   1937      0
 5.0792E+00   7.133759  -0.050903 -47.003331  -1.764749 -99.000000   0.000000   0.282581   0.009380   0.020000   0.085689      2
 2.2000E+05   1.905413  -0.149700 -99.000000 -99.000000  -6.704739   0.000000   0.000833   0.002085   0.020436  0.000E+00  max increase

 doing binary_check_model
 doing binary_finish_step
bin       2   2.400000   8.943924   1.999999  0.000E+00   1.400000          2          1  0.000E+00   1.000000  1.633E+52 -2.261E+32  0.000E+00
   5.079181   1.000000   0.889400   0.000000  0.000E+00 131.978495   3.132084 -7.160E-01  0.000E+00  6.357E-08  0.000E+00 -2.261E+32  0.000E+00
 2.2000E+05   1.400000   0.000000   0.000000 -2.969E+47  94.270353   3.652301 -1.000E+00  0.000E+00  0.000E+00  0.000E+00  0.000E+00          1

 doing star           1 finish_step
 doing star           1 start_step
 doing binary_start_step
 doing star           1 check_model
          3   7.133759   5615.132  -0.152360  -0.152360   1.000000   1.000000   0.696975   0.004067   0.280000  -1.725934   1249      0
 5.1584E+00   7.133759  -0.050873 -47.006384  -1.764965 -99.000000   0.000000   0.282589   0.009380   0.020000   0.085708      2
 3.6400E+05   1.905698  -0.149613 -99.000000 -99.000000  -6.704793   0.000000   0.000827   0.002085   0.020437  0.000E+00  max increase

 doing binary_check_model
 doing binary_finish_step
bin       3   2.400000   8.943923   1.999999  0.000E+00   1.400000          2          1  0.000E+00   1.000000  1.633E+52 -2.261E+32  0.000E+00
   5.158362   1.000000   0.889460   0.000000  0.000E+00 131.978503   3.132083 -7.160E-01  0.000E+00  6.357E-08  0.000E+00 -2.261E+32  0.000E+00
 3.6400E+05   1.400000   0.000000   0.000000 -2.969E+47  94.270359   3.652300 -1.000E+00  0.000E+00  0.000E+00  0.000E+00  0.000E+00          1

 doing star           1 finish_step
We see that the order is:
star start_step -> binary_start_step -> star_check_model -> binary_check_model -> binary_finish_step -> star finish_stepTo test what happens for two evolving stars, we have to change evolve_both_stars to .true. in inlist_project.
Let’s run that model as well:This is the output you should see
doing star           1 start_step
doing star           2 start_step
doing binary_start_step
Default mdot_edd calculation cannot be used when evolving both stars
Maybe you want to set limit_retention_by_mdot_edd=.false. in binary_controls?
Setting mdot_edd to zero
doing star           1 check_model
 1       8   7.133787   5615.134  -0.152359  -0.152359   1.000000   1.000000   0.696975   0.004067   0.280000  -1.725939    802      1
4.8879E+00   7.133787  -0.050874 -47.004363  -1.764912 -99.000000   0.000000   0.282588   0.009380   0.020000   0.085705      2
3.5572E+05   1.905738  -0.149613 -99.000000 -99.000000  -6.704793   0.000000   0.000827   0.002085   0.020437  0.000E+00  max increase

doing star           2 check_model
 2       8   7.241946   6678.421   0.540135   0.540135   1.400000   1.400000   0.697209   0.004993   0.280000  -2.104765    885      1
4.8879E+00   7.241946   0.145296 -41.543815  -0.990817 -99.000000   0.000000   0.282226   0.009365   0.020000   0.067129      3
3.5572E+05   1.911689   0.543982 -99.000000 -99.000000  -7.303330   0.000000   0.000045   0.002085   0.020565  0.000E+00  max increase

doing binary_check_model
doing binary_finish_step
bin       8   2.400000   8.943923   1.999999  0.000E+00   1.400000          0          1  0.000E+00   1.000000  1.633E+52 -2.261E+32  0.000E+00
  4.887919   1.000000   0.889460   0.000000  0.000E+00 131.978503   3.132083 -7.160E-01  0.000E+00  0.000E+00  0.000E+00 -2.261E+32  0.000E+00
3.5572E+05   1.400000   1.397322   0.000000 -2.969E+47  94.270359   3.652300 -6.174E-01  0.000E+00  0.000E+00  0.000E+00  0.000E+00          1

doing star           1 finish_step
doing star           2 finish_step
Se we see that star 1 is evolved before star 2. This leads to a flow chart that looks somewhat like this:
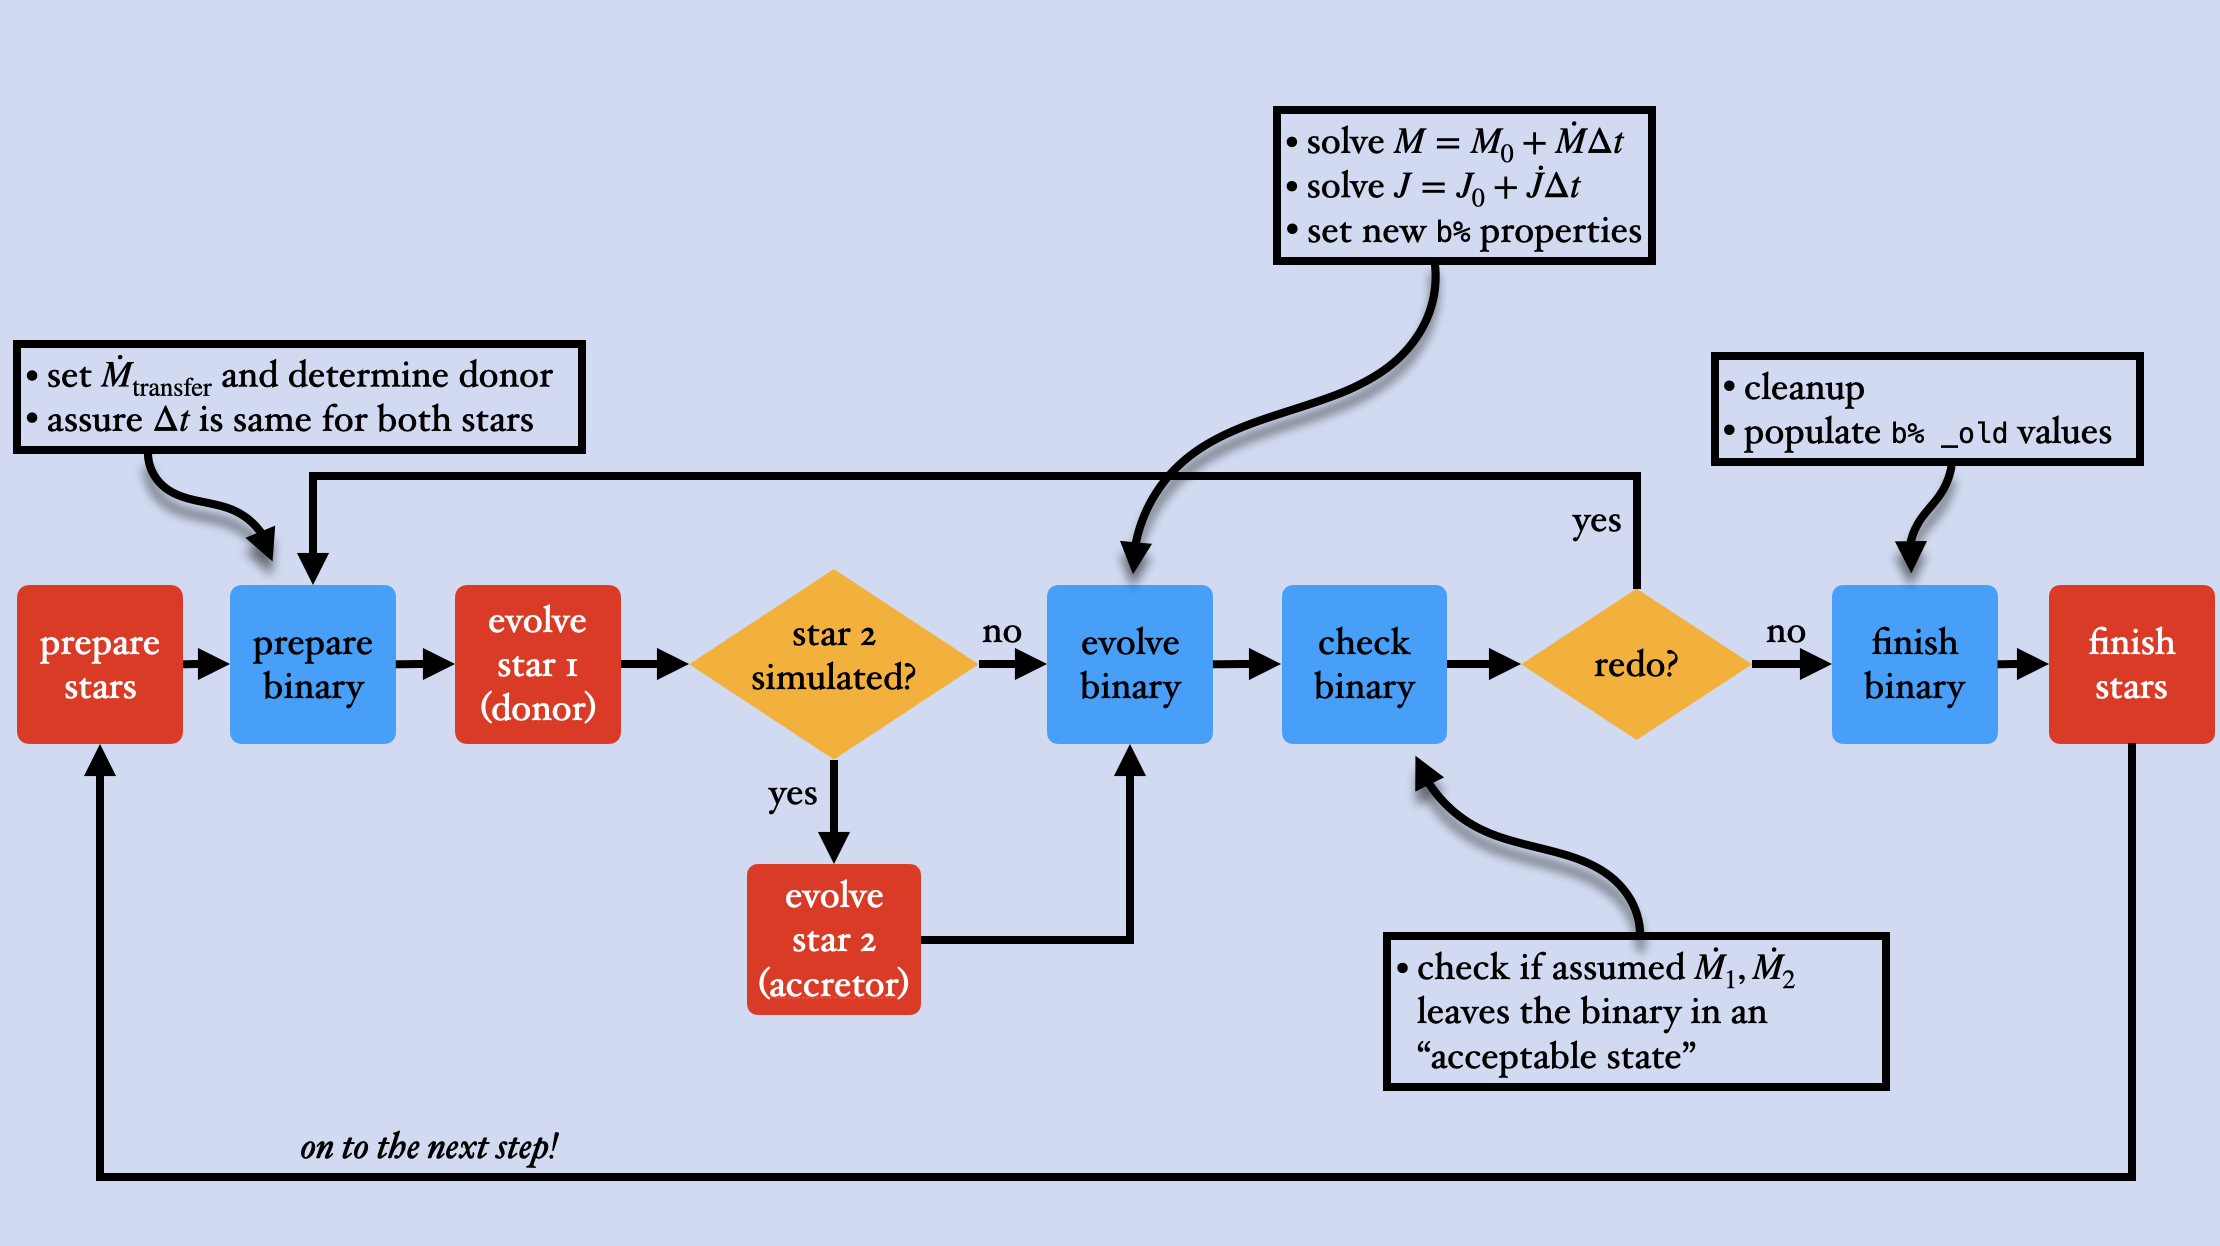
First, we setup both the stars and the binary, by determining which star is the donor and setting a mass-transfer rate for the coming step (this can be zero of course if the stars are not interacting).
Then we use mesa/star to evolve the donor star after which the accretor is evolved.
Then the binary system is evolved, by computing the new angular momentum, eccentricity, and masses given their respective evolution equations.
Next, we check if the model agrees with certain requirements.
The biggest one from the binary side relates to mass transfer.
Some examples:
- if and both stars do not overflow their respective Roche Lobes, this is fine, as it fulfills the requirements for a non-interacting binary.
- On the other hand, if it turns out that the evolution of donor is such that its radius is larger than the Roche Lobe radius, the
roche_lobescheme of mass transfer is violated! We have to redo the step with a higher mass transfer rate, so that (hopefully) this reduces the radius of the donor star to just within the Roche Lobe radius.
Finally, if it is decided that the step is accepted, we do some clean up to finish the step, and in extras_binary_finish_step, this is usually where you can implement custom stopping conditions that depend on the new state of the system.
This we can explore as an exercise:
- First, turn
evolve_both_starsback to.false. - In
&controlsofinlist_project, set the initial period lower to 0.5 days, and setdo_jdot_mb = .false.to disable magnetic braking. - Then, in
run_binary_extras, implement a stopping condition inextras_binary_finish_stepto stop the run as the star reaches 95% of the Roche Lobe (remember to checkbinary_data.incto find out how to retrieve, e.g., the Roche Lobe radius of the star) - Test it with
./mk; ./rn!
Solution
At the end of extras_binary_finish_step:
if (b% r(1) >= 0.95 * b% rl(1)) then
   write(*, *) "star is approaching the Roche Lobe! Mass transfer will ensue, I'm stopping the run here..."
   extras_binary_finish_step = terminate
end if
the binary folder
The $MESA_DIR/binary/private folder contains all the modules responsible for binary evolution.
To get a bit more familiar, we can use tree -C to see the contents:
$ tree -C
.
├── binary_ce.f90
├── binary_ctrls_io.f90
├── binary_do_one_utils.f90
├── binary_edot.f90
├── binary_evolve.f90
├── binary_history.f90
├── binary_history_specs.f90
├── binary_irradiation.f90
├── binary_jdot.f90
├── binary_job_controls.inc
├── binary_job_ctrls_io.f90
├── binary_mdot.f90
├── binary_photos.f90
├── binary_private_def.f90
├── binary_tides.f90
├── binary_timestep.f90
├── binary_utils.f90
├── binary_wind.f90
├── pgbinary_ctrls_io.f90
├── pgbinary_full.f90
├── pgbinary_grid.f90
├── pgbinary_hist_track.f90
├── pgbinary_history_panels.f90
├── pgbinary_lib.f90
├── pgbinary_orbit.f90
├── pgbinary_star.f90
├── pgbinary_stub.f90
├── pgbinary_summary.f90
├── pgbinary_summary_history.f90
├── pgbinary_support.f90
└── run_binary_support.f90

1 directory, 31 files
There are all the physics modules, pgbinary plotting files, as well as run_binary_support.f90 where the main logic and evolution loop lives.
searching through the binary folder
Sometimes you want to know how certain physics is implemented in MESA.
Say for example magnetic braking.
The relevant control for this is jdot_mb, so let search for that:
$ grep -rn "subroutine.*jdot_mb"
./binary_jdot.f90:208:      subroutine check_jdot_mb_conditions(b, s, apply_jdot_mb, qconv_env)
./binary_jdot.f90:253:     end subroutine check_jdot_mb_conditions
./binary_jdot.f90:255:      subroutine default_jdot_mb(binary_id, ierr)
./binary_jdot.f90:336:      end subroutine default_jdot_mb
The third line is the relevant one: it is the start of the magnetic braking subroutine. Digging a bit deeper into that routine, we see at line 283:
b% jdot_mb = -3.8d-30*b% m(b% d_i)*rsun4*
               pow(min(b% r(b% d_i),b% rl(b% d_i))/rsun,b% magnetic_braking_gamma)*
               two_pi_div_p3*jdot_scale
This corresponds to the that Rappaport, Verbunt and Jost 1983 calculated:
As an exercise: Verify the mass-transfer rate description from Ritter 1988:
Solution
grep -rn “subroutine.*ritter”, binary_mdot.f90, lines 711-730binary hooks
Binary hooks function similarly to hooks in mesa/star, by giving the ability to users to implement custom prescriptions of physical ingredients going into MESA.
All binary hooks have “null” functions defined in binary/other, which also specify their function signature (meaning the amount and order of input parameters, you have to respect these because of how hooks are tied into the main code).
test suite
The binary also contains a test suite of several test cases that validate the correct functioning of its components, such as mass transfer, angular momentum, and the binary evolution logic.
When adjustments are made in the code, the developers have to make sure the tests are still passing (and sometimes new test cases need to be designed for new features).
The test suite contains several good starting points for when you embark on new project. However, we must emphasize that the test suite models on their own cannot be used as science-grade models. Their resolution (in both space and time) is limited, and they typically use simplified physics, so one needs to carefully adapt the inlists of the test cases before they produce science-grade models.
pgbinary
We will use a test suite case to introduce pgbinary, which is the binary equivalent of pgstar.
In previous versions of mesa, two pgstar windows were needed if a user wanted to simultaneously plot info of both stars during a binary run.
Now we have pgbinary to do all of this in just one.
pgbinary works just like pgstar, by allowing users to plot windows and save plots to files.
The biggest advantage is that pgbinary has plot types called Star1 and Star2, which essentially hands over plotting duties to pgstar.
Typical usage of pgbinary is to set up a Grid at the binary level, and have both Star1 and Star2 as panels in that grid, along with any other binary information you’d want to plot (eg. the Orbit, some history_panels, etc.).
Once a Star is plotted, it uses the current &pgstar options that are specified in the corresponding inlist at inlist_names(1) for Star1 and inlist_names(2) for Star2.
The Reference tab also contains a list of pgbinary controls.
We can discover pgbinary using one of the test cases:
Navigate to the
binary/test_suitefolderCopy the
evolve_both_starstest case into a location of your choice and navigate to it.In
inlist_project,&binary_job, uncomment thepgbinary_flag = .true.line.set looser timestep controls in
&binary_controlsfr = 5d-2 fr_limit = 1d-1 fj = 5d-2run the model with
./mk; ./rn
A pgbinary window should spawn that looks somewhat like this:
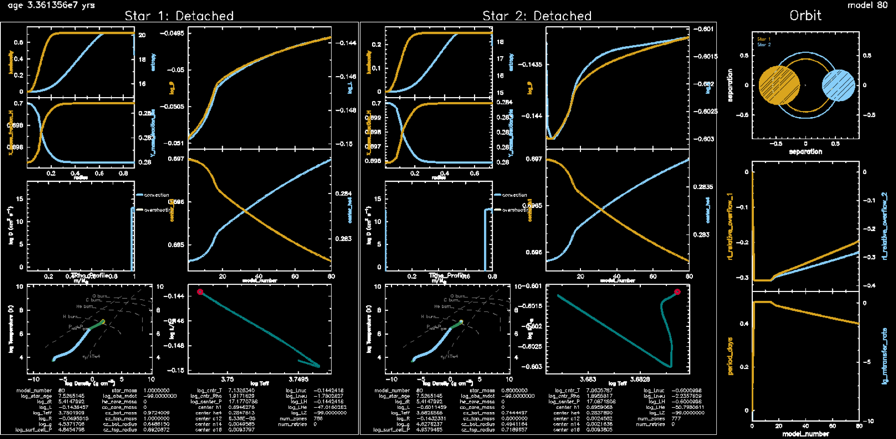
Depending on your screen size, you might want to change the window sizes in Grid1_win_width and Grid1_win_aspect_ratio, and also the text scalings to see things better (Grid1_txt_scale_factor(1) and others for different panels).
As this run progresses, you should see the system evolving from detached to semi-detached, as the star 1 will start transferring mass to star 2. The simulation should stop at around 86 steps with the system entering a contact phase!
Recap
This was a small introduction into mesa/binary.
It contained an overview of how to operate within the work folder, how to access the binary structure b in run_binary_extras and how the binary inlists work.
Next we explored the control flow and saw what order the stars are evolved in.
Finally, binary has a test suite which can we used as starting points for science projects, and you can use pgbinary to get a handy-dandy live overview of a binary run.