Extending MESA with run_star_extras.f90
Inlists, models, and photos are the core of MESA, and you can do a lot of great science without even knowing how to write a line of Fortran code. But fairly soon in your MESA journey, you will run into limits of what you can do with inlists alone. This is where run_star_extras.f90 comes in. It allows you to extend MESA’s capabilities by writing your own Fortran code that can interact with the star model. A few examples of things you can do with run_star_extras.f90 include:
- creating a custom stopping condition
- changing control parameters during a run without restarting
- adding custom data to profile or history files
- implementing custom physics, like energy sources or mass loss prescriptions
The goal of these exercises is to get you up and running with run_star_extras.f90 and provide a resource you can return to when you next need to extend MESA.
About This Tutorial
Prerequisites
This tutorial assumes you
- have a working installation of MESA 24.08.1
- can do basic command line operations
- can open, edit, and save files in a text editor
- know basic MESA operations like editing inlists, looking up documentation, compiling, and running MESA projects
Before starting this tutorial, students had a short presentation. You can find the slides for that presentation here or the interactive Google Slides version which has more context in the presenter notes here. However, one can complete this tutorial without having seen that presentation.
Learning Objectives
In this tutorial you’ll learn how to…
- set up a MESA project to use
run_star_extras.f90 - understand the structure of
run_star_extras.f90and how it fits into MESA’s execution flow - implement a custom stopping condition that couldn’t be done with inlists alone
- implement new physics in MESA by writing some basic Fortran code
- [BONUS] add new columns to the profile and history files
You’ll do this by reading through the provided material and completing clearly outlined tasks. Most tasks have hints and/or answers available if you get stuck. Don’t be afraid to use these! Just click on the header for a hint or answer to expand it.
About the Author
Hi, I’m Bill Wolf. I’m an associate professor of physics and astronomy at the University of Wisconsin–Eau Claire, where I study the physics of accreting white dwarf stars with a team of undergraduate researchers. I’ve been using MESA since 2012 and have been a TA, organizer, or lecturer in 11 MESA schools since. I’ve been on the MESA Developer team since 2017, where my primary responsibility is our distributed testing infrastructure. I also wrote a few tools to work with MESA, including MESA Explorer, MESA Reader, and MesaScript.
Acknowledgements
This material is strongly influenced by similar material from past MESA schools by Josiah Schwab, a former MESA developer. Specifically, this material is a light updating and reformatting of the later material in his introductory materials for the 2021 MESA summer school.
Part 0: Fortran Basics
Fortran is a powerful language for scientific computing offering modern features with strong performance. However, one rarely writes in Fortran for their everyday tasks. With MESA, you’ll rarely need to write much Fortran from scratch, but you will need to edit functions (which cannot change their inputs and must have a return value) and subroutines (which can change their inputs and have no return value). This section provides some basic Fortran syntax to get you started. If you are already familiar with Fortran, feel free to skip this section. If you are new, skim it and come back to it as needed.
Variables
Declaring Variables
Fortran is a statically-typed language, meaning you must declare the type of each variable before using it. The type of a variable determines what kind of data it can hold and how much memory it uses. Variable declarations must come at the beginning of function and subroutine implementations. Here are some common types:
! declare a boolean variable
logical :: flag

! declare an integer variable
integer :: i

! declare a double precision variable
real(dp) :: foo

! declare a 1d array with 10 elements
real(dp), dimension(10) :: bar
Note: to make a variable double precision, you must declare it with real(dp) rather than just real.
Assigning Variables
When dealing with numerical literals, Fortran uses the d suffix to indicate double precision. For example, 3.14 is single precision, while 3.14d0 is double precision. Here are some examples of assigning values to variables:
! booleans have two special values
flag = .true.
flag = .false.

! arrays are 1-indexed (using parentheses)
bar(1) = 3.14d0
bar(2:9) = 0
bar(10) = 2.72d0
Logic and Control Flow
Comparison Operators
There are two (equivalent) forms of comparison operators in Fortran
| text form | symbol form | description |
|---|---|---|
.gt. | > | greater than |
.lt. | < | less than |
.ge. | >= | greater than or equal to |
.le. | <= | less than or equal to |
.eq. | == | equal to |
.ne. | /= | not equal to |
! these are the same
(i .ne. 0)
(i /= 0)
Logical Operators
There are three logical operators: .and., .or., and .not..
! true when 0 < i < 10
((i > 0) .and. (i < 10))

! true when i /= 0,1
(.not. ((i .eq. 0) .or. (i .eq. 1)))
If, Then, and Else
! here is an example of how to do some logic
if (x .gt. 0) then
   heavyside = 1.0
else if (x .lt. 0) then
   heavyside = 0.0
else
   heavyside = 0.5
end if
Loops
! here is an example of a do loop
array(1) = 1
array(2) = 1
do i = 3, 10
   array(i) = array(i-1) + array(i-2)
enddo
Part 1: Setting Up Your Project
Warning
These next two code blocks show how you might set up a MESA project, but don’t actually execute them! In Task 1.1, you’ll actually get your project set up.
When starting a new MESA project, you will often begin with the default work directory:
cp -r $MESA_DIR/star/work my_new_project
cd my_new_project
This would create a new directory called my_new_project with the default MESA work directory structure. You could then edit the inlist files to set up your model.
In other cases, you might start with an existing test case that is close to the science you are interested in. For instance, I study novae, so I might start with the wd_nova_burst test case:
cp -r $MESA_DIR/star/test_suite/wd_nova_burst my_new_project
cd my_new_project
For this tutorial, I am providing a work directory that is already set up for you. It’s pretty simple; it evolves a 1.0 solar mass star from near the zero-age main sequence to core hydrogen exhaustion, and then pauses before exiting.
Note
This work directory is designed to run pretty quickly. For parts 1 through 3, no simulations should take more than about a minute to run. They may take a bit longer in part 4, but still should finish within a few minutes.
| 📋 Task 1.1 |
|---|
| Download the work directory, move it somewhere sensible, unzip it, and change into the directory. |
Click here for hints or answers
After downloading the work directory linked in the task above, you can do everything else from the command line:
Move the directory to your desktop (or wherever you want to work on it):
mv ~/Downloads/day2-dev_mesa.zip ~/Desktop/Unzip the directory:
unzip ~/Desktop/day2-dev_mesa.zipChange into the directory:
cd ~/Desktop/day2-devIf your computer is too smart, it may have automatically unzipped the directory for you. In that case, you can just move the directory and change into it:
mv ~/Downloads/day2-dev ~/Desktop/
cd ~/Desktop/day2-dev
Now let’s make sure everything is working correctly.
| 📋 Task 1.2 |
|---|
| Compile and run the project. |
If things are set up properly, you should see a pgstar window open up, and the project should run for about 94 timesteps and pause before closing. If not, consult the hints and answer below, and reach out to tablemates or a TA for help if you can’t get it working.
Answer
To compile and run the project, you can use the following commands:
./mk && ./rnNote that putting && between two commands means that the second command will only run if the first command succeeds. If you want to run the commands separately, you can use ./mk to compile and ./rn to run the project.
Hint: Troubleshooting
Are you in the correct directory? Execute ls to make sure you see the normal contents of a MESA work directory, including inlist, mk, and rn.
Is your MESA environment set up correctly? Ensure that executing mesasdk_version prints out the version of the MESA SDK you have installed, and similarly ensure that echo $MESA_DIR prints out the path to your MESA installation.
It’s also possible that the executables (like ./mk and ./rn) are not executable as a side effect of downloading these files from the web. You can make them executable with the following command:
chmod +x mk rn clean rePart 2: Setting Up Your run_star_extras.f90
The file run_star_extras.f90 lives in the src directory of your work directory. It is a Fortran file you can edit to add your own custom code that will run during the evolution of your stellar model. The file is already set up, but isn’t very useful yet.
Creating a boilerplate run_star_extras.f90
Note
We’ll be opening and editing files a lot for the rest of this tutorial. For simplicity, I’m assuming you’re using VS Code and its associated code command to open and edit files. But if you’re using, say, Emacs, you can substitute code with emacs (or whatever command you use to open files in your text editor of choice).
| 📋 Task 2.1 |
|---|
Open the file run_star_extras.f90 in your favorite text editor. |
You can change into the src directory and then open the file (e.g. cd src && code run_star_extras.f90, but remember to cd .. to return to the work directory when you are done with the src directory) or open it directly (e.g. code src/run_star_extras.f90) |
You should see a file that looks like this:
! ***********************************************************************
!
!   Copyright (C) 2010-2019  Bill Paxton & The MESA Team
!
!   this file is part of mesa.
!
!   REMAINING COMMENTS OMITTED FOR BREVITY
!
! ***********************************************************************

      module run_star_extras

      use star_lib
      use star_def
      use const_def
      use math_lib

      implicit none

      ! these routines are called by the standard run_star check_model
      contains

      include 'standard_run_star_extras.inc'

      end module run_star_extras
This file defines a module called run_star_extras, which itself loads four other modules (star_lib, star_def, const_def, and math_lib), which refer to different parts of MESA’s other modules that might be useful to you. The implicit none statement is a good practice in Fortran that prevents you from accidentally using variables that haven’t been declared.
The actual “body” of the module is then delegated to the file standard_run_star_extras.inc, which is included at the end of the module. This file has the main boilerplate of most of the code you might want to edit, and it is by default set up to do nothing. To edit this text, though, we need to copy it into our run_star_extras.f90.
| 📋 Task 2.2 |
|---|
Copy the entire contents of $MESA_DIR/include/standard_run_star_extras.inc and paste them into your run_star_extras.f90 file, replacing the include 'standard_run_star_extras.inc' line. |
Maintain the lines above and below the include line, as they are necessary for the module to work correctly. |
Hint
There are fancy command line ways to do this, but for me, I prefer to actually do the copy and paste in a text editor. Open up the file with your favorite text editor. Perhaps with VS Code:
code $MESA_DIR/include/standard_run_star_extras.incThen select all the text in the file, copy it, and paste it into your run_star_extras.f90 file. You can open that file in the same way:
code src/run_star_extras.f90of if you are already in the src directory, you can just use:
code run_star_extras.f90The newly-pasted content should start with the subroutine extras_controls and end with the subroutine extras_after_evolve, though the line end module run_star_extras should still be at the end of the file.
Answer
Below is the complete contents of what your edited run_star_extras.f90 file should look like. If you ran into issues getting things copied properly, just copy the code below and paste it into your run_star_extras.f90 file, replacing everything in that file.
! ***********************************************************************
!
!   Copyright (C) 2010-2019  Bill Paxton & The MESA Team
!
!   this file is part of mesa.
!
!   mesa is free software; you can redistribute it and/or modify
!   it under the terms of the gnu general library public license as published
!   by the free software foundation; either version 2 of the license, or
!   (at your option) any later version.
!
!   mesa is distributed in the hope that it will be useful,
!   but without any warranty; without even the implied warranty of
!   merchantability or fitness for a particular purpose.  see the
!   gnu library general public license for more details.
!
!   you should have received a copy of the gnu library general public license
!   along with this software; if not, write to the free software
!   foundation, inc., 59 temple place, suite 330, boston, ma 02111-1307 usa
!
! ***********************************************************************

      module run_star_extras

      use star_lib
      use star_def
      use const_def
      use math_lib

      implicit none

      ! these routines are called by the standard run_star check_model
      contains

      subroutine extras_controls(id, ierr)
         integer, intent(in) :: id
         integer, intent(out) :: ierr
         type (star_info), pointer :: s
         ierr = 0
         call star_ptr(id, s, ierr)
         if (ierr /= 0) return

         ! this is the place to set any procedure pointers you want to change
         ! e.g., other_wind, other_mixing, other_energy  (see star_data.inc)


         ! the extras functions in this file will not be called
         ! unless you set their function pointers as done below.
         ! otherwise we use a null_ version which does nothing (except warn).

         s% extras_startup => extras_startup
         s% extras_start_step => extras_start_step
         s% extras_check_model => extras_check_model
         s% extras_finish_step => extras_finish_step
         s% extras_after_evolve => extras_after_evolve
         s% how_many_extra_history_columns => how_many_extra_history_columns
         s% data_for_extra_history_columns => data_for_extra_history_columns
         s% how_many_extra_profile_columns => how_many_extra_profile_columns
         s% data_for_extra_profile_columns => data_for_extra_profile_columns

         s% how_many_extra_history_header_items => how_many_extra_history_header_items
         s% data_for_extra_history_header_items => data_for_extra_history_header_items
         s% how_many_extra_profile_header_items => how_many_extra_profile_header_items
         s% data_for_extra_profile_header_items => data_for_extra_profile_header_items

      end subroutine extras_controls


      subroutine extras_startup(id, restart, ierr)
         integer, intent(in) :: id
         logical, intent(in) :: restart
         integer, intent(out) :: ierr
         type (star_info), pointer :: s
         ierr = 0
         call star_ptr(id, s, ierr)
         if (ierr /= 0) return
      end subroutine extras_startup


      integer function extras_start_step(id)
         integer, intent(in) :: id
         integer :: ierr
         type (star_info), pointer :: s
         ierr = 0
         call star_ptr(id, s, ierr)
         if (ierr /= 0) return
         extras_start_step = 0
      end function extras_start_step


      ! returns either keep_going, retry, or terminate.
      integer function extras_check_model(id)
         integer, intent(in) :: id
         integer :: ierr
         type (star_info), pointer :: s
         ierr = 0
         call star_ptr(id, s, ierr)
         if (ierr /= 0) return
         extras_check_model = keep_going
         if (.false. .and. s% star_mass_h1 < 0.35d0) then
            ! stop when star hydrogen mass drops to specified level
            extras_check_model = terminate
            write(*, *) 'have reached desired hydrogen mass'
            return
         end if


         ! if you want to check multiple conditions, it can be useful
         ! to set a different termination code depending on which
         ! condition was triggered.  MESA provides 9 customizable
         ! termination codes, named t_xtra1 .. t_xtra9.  You can
         ! customize the messages that will be printed upon exit by
         ! setting the corresponding termination_code_str value.
         ! termination_code_str(t_xtra1) = 'my termination condition'

         ! by default, indicate where (in the code) MESA terminated
         if (extras_check_model == terminate) s% termination_code = t_extras_check_model
      end function extras_check_model


      integer function how_many_extra_history_columns(id)
         integer, intent(in) :: id
         integer :: ierr
         type (star_info), pointer :: s
         ierr = 0
         call star_ptr(id, s, ierr)
         if (ierr /= 0) return
         how_many_extra_history_columns = 0
      end function how_many_extra_history_columns


      subroutine data_for_extra_history_columns(id, n, names, vals, ierr)
         integer, intent(in) :: id, n
         character (len=maxlen_history_column_name) :: names(n)
         real(dp) :: vals(n)
         integer, intent(out) :: ierr
         type (star_info), pointer :: s
         ierr = 0
         call star_ptr(id, s, ierr)
         if (ierr /= 0) return

         ! note: do NOT add the extras names to history_columns.list
         ! the history_columns.list is only for the built-in history column options.
         ! it must not include the new column names you are adding here.


      end subroutine data_for_extra_history_columns


      integer function how_many_extra_profile_columns(id)
         integer, intent(in) :: id
         integer :: ierr
         type (star_info), pointer :: s
         ierr = 0
         call star_ptr(id, s, ierr)
         if (ierr /= 0) return
         how_many_extra_profile_columns = 0
      end function how_many_extra_profile_columns


      subroutine data_for_extra_profile_columns(id, n, nz, names, vals, ierr)
         integer, intent(in) :: id, n, nz
         character (len=maxlen_profile_column_name) :: names(n)
         real(dp) :: vals(nz,n)
         integer, intent(out) :: ierr
         type (star_info), pointer :: s
         integer :: k
         ierr = 0
         call star_ptr(id, s, ierr)
         if (ierr /= 0) return

         ! note: do NOT add the extra names to profile_columns.list
         ! the profile_columns.list is only for the built-in profile column options.
         ! it must not include the new column names you are adding here.

         ! here is an example for adding a profile column
         !if (n /= 1) stop 'data_for_extra_profile_columns'
         !names(1) = 'beta'
         !do k = 1, nz
         !   vals(k,1) = s% Pgas(k)/s% P(k)
         !end do

      end subroutine data_for_extra_profile_columns


      integer function how_many_extra_history_header_items(id)
         integer, intent(in) :: id
         integer :: ierr
         type (star_info), pointer :: s
         ierr = 0
         call star_ptr(id, s, ierr)
         if (ierr /= 0) return
         how_many_extra_history_header_items = 0
      end function how_many_extra_history_header_items


      subroutine data_for_extra_history_header_items(id, n, names, vals, ierr)
         integer, intent(in) :: id, n
         character (len=maxlen_history_column_name) :: names(n)
         real(dp) :: vals(n)
         type(star_info), pointer :: s
         integer, intent(out) :: ierr
         ierr = 0
         call star_ptr(id,s,ierr)
         if(ierr/=0) return

         ! here is an example for adding an extra history header item
         ! also set how_many_extra_history_header_items
         ! names(1) = 'mixing_length_alpha'
         ! vals(1) = s% mixing_length_alpha

      end subroutine data_for_extra_history_header_items


      integer function how_many_extra_profile_header_items(id)
         integer, intent(in) :: id
         integer :: ierr
         type (star_info), pointer :: s
         ierr = 0
         call star_ptr(id, s, ierr)
         if (ierr /= 0) return
         how_many_extra_profile_header_items = 0
      end function how_many_extra_profile_header_items


      subroutine data_for_extra_profile_header_items(id, n, names, vals, ierr)
         integer, intent(in) :: id, n
         character (len=maxlen_profile_column_name) :: names(n)
         real(dp) :: vals(n)
         type(star_info), pointer :: s
         integer, intent(out) :: ierr
         ierr = 0
         call star_ptr(id,s,ierr)
         if(ierr/=0) return

         ! here is an example for adding an extra profile header item
         ! also set how_many_extra_profile_header_items
         ! names(1) = 'mixing_length_alpha'
         ! vals(1) = s% mixing_length_alpha

      end subroutine data_for_extra_profile_header_items


      ! returns either keep_going or terminate.
      ! note: cannot request retry; extras_check_model can do that.
      integer function extras_finish_step(id)
         integer, intent(in) :: id
         integer :: ierr
         type (star_info), pointer :: s
         ierr = 0
         call star_ptr(id, s, ierr)
         if (ierr /= 0) return
         extras_finish_step = keep_going

         ! to save a profile,
            ! s% need_to_save_profiles_now = .true.
         ! to update the star log,
            ! s% need_to_update_history_now = .true.

         ! see extras_check_model for information about custom termination codes
         ! by default, indicate where (in the code) MESA terminated
         if (extras_finish_step == terminate) s% termination_code = t_extras_finish_step
      end function extras_finish_step


      subroutine extras_after_evolve(id, ierr)
         integer, intent(in) :: id
         integer, intent(out) :: ierr
         type (star_info), pointer :: s
         ierr = 0
         call star_ptr(id, s, ierr)
         if (ierr /= 0) return
      end subroutine extras_after_evolve

      end module run_star_extras
Warning
NEVER edit the $MESA_DIR/include/standard_run_star_extras.inc file directly, as it is part of the MESA source code and is read by any MESA project that uses the stock run_star_extras.f90. Instead, you should always copy the contents of this file into your own run_star_extras.f90 and edit that file.
Whenever you change the run_star_extras.f90 file, you will need to recompile your project for the changes to take effect. You do not need to recompile your project if you only change the inlists or other files that are not part of the src directory. Usually a simple ./mk will suffice, but if things are wonky, you can try ./clean && ./mk to clean the project and recompile from scratch.
| 📋 Task 2.3 |
|---|
| Compile and run the project again. |
Answer
In your main work directory, run
./mk && ./rnEverything should run just as before. If you see errors, read them carefully, and if you can’t figure out what went wrong, ask a TA or tablemate for help.
Baby’s first Fortran and Fortran Errors
Now that we have a boilerplate run_star_extras.f90 file, we can start modifying MESA’s behavior with our own code. We should briefly review what all these functions and subroutines do, and then we can write our first Fortran code.
Perhaps you’ve seen the flowchart below (courtesy of Josiah Schwab) before. It shows the flow of control in MESA’s evolution code, and how run_star_extras.f90 fits into it. You might want to download this flowchart and use it to prototype where your own code will go.
Each of the extras_* functions and subroutines in run_star_extras.f90 is called at a different point in the evolution process. Need to set a variable at the beginning of a run? Use extras_startup. Need to check a condition at the end of each step? Use extras_finish_step. We won’t see examples of all of these today, but I encourage you to look at the run_star_extras.f90 files in many of the MESA test cases to learn more about how they can be used.
extras_check_model is one of the more commonly used functions, as it is called at the end of the series of solver iterations that actually evolve the model. It’s main job is to tell MESA to redo a timestep, retry it with a smaller timestep (if convergence is tough or it overshot some stopping condition), move on to the next step, or to terminate the run. Let’s use it to do the simplest thing we can: print a message to the terminal. This is a good first step to make sure we can compile and run our code without errors.
| 📋 Task 2.4 |
|---|
Add the following code to the extras_check_model function in your run_star_extras.f90 file: write(*,*) 'Hello, MESA!' |
| Compile and run the project again, confirming that you get a bunch of annoying messages printed to the terminal. |
Once you confirm that the code works, you may cancel the run by pressing Ctrl+C in the terminal. |
Hint: Wait, this thing isn't empty!
Yes, the “boilerplate” function is certainly not empty. It should look like this:
integer function extras_check_model(id)
    integer, intent(in) :: id
    integer :: ierr
    type (star_info), pointer :: s
    ierr = 0
    call star_ptr(id, s, ierr)
    if (ierr /= 0) return
    extras_check_model = keep_going
    if (.false. .and. s% star_mass_h1 < 0.35d0) then
        ! stop when star hydrogen mass drops to specified level
        extras_check_model = terminate
        write(*, *) 'have reached desired hydrogen mass'
        return
    end if


    ! if you want to check multiple conditions, it can be useful
    ! to set a different termination code depending on which
    ! condition was triggered.  MESA provides 9 customizable
    ! termination codes, named t_xtra1 .. t_xtra9.  You can
    ! customize the messages that will be printed upon exit by
    ! setting the corresponding termination_code_str value.
    ! termination_code_str(t_xtra1) = 'my termination condition'

    ! by default, indicate where (in the code) MESA terminated
    if (extras_check_model == terminate) s% termination_code = t_extras_check_model
end function extras_check_model
That’s quite a mouthful! Everything down to and including extras_check_model = keep_going is boilerplate code that you should not change. It defines the type of the single input (an integer associated with the stellar model in question, called id), an error-tracking integer ierr, and the star info structure s, which is an enormous structure that contains all data about the stellar model (more on this later).
Below that, and up until the if (extras_check_model == terminate) line is an example stopping condition and explanation comments that you may delete if you wish. I’ll explain what’s going on there, though, as custom stopping conditions are a common use of extras_check_model.
The if (.false. .and. s% star_mass_h1 < 0.35d0) line is a placeholder for a condition that will never be true. If the .false. were instead .true., this sets a custom stopping condition based on the star’s hydrogen mass, which is a member of the s structure with a key of star_mass_h1. Assuming the stopping condition has been met, you can see a message being printed out, and the crucial line extras_check_model = terminate, which tells MESA to stop the evolution and exit. The line s% termination_code = t_extras_check_model sets a custom termination code that can be used to identify where the star model stopped; this is useful particularly in test cases to ensure that a model stopped for the reason we expect it to stop.
So where does your code go? I recommend putting it right after the extras_check_model = keep_going line, as this is where you can add your own custom code that will run at the end of each timestep.
Answer
Your final extras_check_model function should look like this (I’ve removed the bogus stopping condition and extra comments; see hint above for context):
integer function extras_check_model(id)
    integer, intent(in) :: id
    integer :: ierr
    type (star_info), pointer :: s
    ierr = 0
    call star_ptr(id, s, ierr)
    if (ierr /= 0) return
    extras_check_model = keep_going
    write(*,*) 'Hello, MESA!'

    if (extras_check_model == terminate) s% termination_code = t_extras_check_model
end function extras_check_model
Ensure that your function looks just like this, with the write(*,*) 'Hello, MESA!' line added after the extras_check_model = keep_going line. Then in the terminal, run the following commands to compile and run the project:
./mk && ./rnYou should see a bunch of messages printed to the terminal, including Hello, MESA! printed at the end of each timestep. If you see any errors, read them carefully, and if you can’t figure out what went wrong, ask a TA or tablemate for help.
Now that you’ve got some working code, let’s break it! We’re going to intentionally introduce a syntax error and see what happens.
| 📋 Task 2.5 |
|---|
Change the write(*,*) 'Hello, MESA!' line to write(*,*) 'Hello, MESA!. Notice the missing closing quote at the end of the string. |
| Compile the project again and read the error message carefully. Could you figure out what went wrong without the benefit of knowing what the error was going to be? |
Answer
Your [broken] code should now look like this:
integer function extras_check_model(id)
    integer, intent(in) :: id
    integer :: ierr
    type (star_info), pointer :: s
    ierr = 0
    call star_ptr(id, s, ierr)
    if (ierr /= 0) return
    extras_check_model = keep_going
    write(*,*) 'Hello, MESA!

    if (extras_check_model == terminate) s% termination_code = t_extras_check_model
end function extras_check_model
When you run ./mk, you should see an error message like this:
../src/run_star_extras.f90:100:22:

  100 |          write(*,*) 'Hello, MESA!
      |                      1
Error: Unterminated character constant beginning at (1)
make: *** [run_star_extras.o] Error 1

FAILED
This indicates that the string beginning at the position marked by “1” (below the letter H) on line 100 (for me, at least) is unterminated, meaning that the compiler expected a closing quote but didn’t find one. The compiler is pretty good at pointing out where the error is, but sometimes it can be a bit more cryptic than this helpful error. But don’t ignore compiler errors! They are your friend, and they will help you find and fix bugs in your code.
| 📋 Task 2.6 |
|---|
“Fix” the error by deleting the entire write(*,*) 'Hello, MESA! line. |
Compile and run the project again. You should see no output from the extras_check_model function, as it is now empty. |
You’ve now made some edits to the run_star_extras.f90 file, compiled it, and run it successfully. You’ve even seen what an error looks like. Now let’s get to doing something more interesting.
Part 3: Adding a Custom Stopping Condition
If you assume the Earth is a perfect blackbody, its equilibrium temperature is given by
Suppose the model we’re been playing with is meant to model the sun, and we want to stop the evolution when the temperature at Earth rises above some critical value. The first step would be to search through $MESA_DIR/star/controls.defaults (or the equivalent page on the online MESA documentation) to see if such a stopping condition already exists. I can tell you right now, though, that it does not. We’re going to have to add this condition ourselves.
Before we do that, though, we need to talk a bit about how the star info structure works.
The Star Info Structure
Internally, all the information about your stellar model is stored in a single giant structure called the star info structure. This object has all the data about the star like its mass, luminosity, temperature profile, etc. It also contains all of the parameters you set in the inlists (whether you explicitly set them or not). Finally, it has pointers to functions it might use, like the very extras_check_model function we just edited (see how they are set in extras_controls).
Within most functions in run_star_extras.f90, you will see a line like this:
type (star_info), pointer :: sThis declares a pointer to the star info structure, which we will use to access the data about the star. Simply declaring this variable doesn’t set it up, though. We need to call the star_ptr subroutine to set it up. This is done in the boilerplate code at the beginning of each function, like so:
ierr = 0
call star_ptr(id, s, ierr)
if (ierr /= 0) return
The star_ptr subroutine takes the id of the star model (which is passed to the function) and sets the pointer s to point to the star info structure for that model. If there is an error, it sets ierr to a non-zero value, which we check for immediately after calling star_ptr. If there is an error, we return from the function early.
This is a common pattern in MESA code, and you’ll see it in many of the functions in run_star_extras.f90. The star info structure is a powerful tool that allows you to access all the data about your star model, and it’s essential to understand how to use it.
So what are all the “members” of the star info structure? Unfortunately, they’re not as well documented as they could be, but here are a few guidelines for learning about different types of members.
Stellar Structure: For quantities of interest for stellar structure, check
$MESA_DIR/star_data/public/star_data_step_work.incand$MESA_DIR/star_data/public/star_data_step_input.inc, though other files in the same folder may also contain useful members. Unless otherwise specified in the comments, all members are in cgs units. This is not usually the case for inlist values, which often use solar values.Inlist Values: All inlist controls are also members of the star info structure, so you can access (and change!) them in your
run_star_extras.f90file. Whether the changes you make will take effect on the current timestep or the next one depends on the specific control and what function/subroutine you change it in withinrun_star_extras.f90.
One very useful family of inlist value members are the extra user-accessible inlist values, called x_ctrl, x_integer_ctrl, and x_logical_ctrl. These are all arrays that can be set in the inlist (e.g. x_ctrl(1) = 3.14d0) and are then made available in the star_info structure (e.g. s% x_ctrl(1)). This is a much better way to communicate data with your run_star_extras.f90 file than modifying the code directly, necessitating frequent recompilation.
Accessing Members of the Star Info Structure
To access a member of the star info structure, you use the % operator. For example, to access an array of the star’s mass at each zone, you’d use s% m (assuming s is the pointer to the star info structure). To access a single value, like the star’s luminosity, you’d use s% photosphere_L. If you’ve used other programming languages, this is similar to accessing a property of an object in Python or JavaScript, or a field of a struct in C; we just use the % operator instead of a dot (.) or arrow (->) operator.
Aside: Solar vs. cgs Units
Internally, MESA is all in cgs units, but many inlist values (and some members of the star info structure) are in solar units out of convenience. Additionally, many user-specified values will be in solar units. So being able to convert between solar and cgs units is very useful. For calculations like these, use the const module. The file $MESA_DIR/const/public/const_def.f90 defines many useful constants. So long as const_def module is included in your run_star_extras.f90 file, you can access them from anywhere. They are not part of the star info structure, so you don’t need to use the s% prefix to access them. For example, to get the solar luminosity in erg/s, you would use Lsun, which is defined in const_def.f90.
Assembling the Pieces
Now that we know how to access the star info structure, we can add a custom stopping condition based on the temperature at Earth. The first question you should ask is: where should this condition go in run_star_extras.f90? Given what we saw in extras_check_model, it seems like a reasonable place to put it. Indeed, this is how many stopping conditions are implemented. However, if you look at the flowchart above, you’ll see that there is another function that gets the final say after a timestep is completed: extras_finish_step. This is actually a more appropriate place to put this condition, as it is called after a timestep is completed and the model is considered good enough to continue evolving (rather than being redone/retried).
Once you know where you’ll put the code, you need to know how to calculate the temperature at Earth. The equilibrium temperature of the Earth is given by:
where is the effective temperature of the star and is the photospheric radius of the star. We need to figure out how to access these values in the star info structure.
| 📋 Task 3.1 |
|---|
Look in $MESA_DIR/star_data/public/star_data_step_work.inc and $MESA_DIR/star_data/public/star_data_step_input.inc and find the members of the star info structure that correspond to the effective temperature and photospheric radius of the star. |
| You might find a couple of promising candidates, so look at comments, and then check your answer below. |
Answer
They are Teff (in star_data_step_input) or photosphere_black_body_T (in star_data_step_work) and photosphere_R (in star_data_step_work). Notably, photosphere_R is in solar units, so we will need to convert it to centimeters before using it in our calculation. The effective temperature is already in cgs units, so we can use it directly.
I’ll give an honorable mention for photosphere_T (in star_data_step_work), but then we might get into a tough conversation about the precise definition of the effective temperature. Since it’s the power coming from the sun that matters, the thing called effective temperature is what we want to use.
There are a couple of other radii to look at (for instance, s% r(1) is the radius at the first zone, but this may not be the photosphere depending on how the outer boundary condition is set up). My guess is that it wouldn’t matter too much if you used something similar, but these are exactly the sorts of questions you should ask when you’re writing your own extensions to MESA!
If you’re uncertain about the precise meaning of a member, your best bet now is to go spelunking through the MESA source code ($MESA_DIR/star/private) and look where the value is set or used. Usually using grep with s% *MEMBER_NAME* is a good place to start in finding these values in the wild. If you still can’t find it, but you can at least trace some of your steps, showing this work in a message to the MESA Discussion forum will make it much more likely that others will help you pick up the trail!
Now that we have the star info structure members rounded up, there’s another wrinkle: the radius will be in solar units while the temperature will be in cgs units, so we’ll also need to convert AU and
to cm. We could look these up and hardcode them, but MESA has a const module that contains many useful constants, and it’s included and ready to use.
| 📋 Task 3.2 |
|---|
Look in $MESA_DIR/const/public/const_def.f90 and find the constants that corresponds to the number of centimeters in an astronomical unit (AU) and a solar radius
. |
Answer
Unsurprisingly, the AU is just called au (or AU; Fortran is case-insensitive). You can find it on line 94 of $MESA_DIR/const/public/const_def.f90.
real(dp), parameter :: au = 1.49597870700D13 ! (cm) - exact value defined by IAU 2009, 2012And the solar radius is called Rsun. You can find it on line 129 of the same file.
Putting It All Together
Now that we have all the pieces, we can put them together to create a custom stopping condition. We’ll add this code to the extras_finish_step function, which is called after each timestep is completed.
| 📋 Task 3.3 |
|---|
Edit extras_finish_step in your run_star_extras.f90 file to compute the temperature at Earth and print it to the screen. You’ll need to use the members we found earlier as well as the constants for an AU and
. |
| Compile and run the project to make sure it works. You should see temperatures that start around 250 K and continuously rise to around 300 K by the end of the run (but you don’t need to run to completion). |
Hint: Defining a New Variable
While not absolutely necessary, I recommend defining a new variable for the equilibrium temperature of the Earth. You can do this by adding a line like this at the top of the extras_finish_step function:
real(dp) :: T_eq_earthThen later on in the function, you can compute the equilibrium temperature of the Earth and assign it to this variable. Then you can use it like any other variable.
Answer
Here’s an implementation of the extras_finish_step function that computes the equilibrium temperature of the Earth and prints it to the screen:
integer function extras_finish_step(id)
    integer, intent(in) :: id
    integer :: ierr
    type (star_info), pointer :: s
    real(dp) :: T_eq_earth
    ierr = 0
    call star_ptr(id, s, ierr)
    if (ierr /= 0) return
    extras_finish_step = keep_going

    T_eq_earth = s% Teff * (s% photosphere_R * Rsun / (2d0 * AU))**0.5d0
    write(*,*) 'Earth equilibrium temperature:', T_eq_earth

    if (extras_finish_step == terminate) s% termination_code = t_extras_finish_step
end function extras_finish_step
The highlighted lines show the definition of the variable T_eq_earth, its assignment using the formula, constants, and star info structure members we discussed earlier, and the write statement that prints the equilibrium temperature of the Earth to the screen.
As usual, compile and run the project again with ./mk && ./rn.
| 📋 Task 3.4 |
|---|
Further edit your extras_finish_step function to check if the equilibrium temperature of the Earth exceeds the value set in x_ctrl(1). If it does, print a message to the terminal and set extras_finish_step = terminate to stop the evolution. You’ll need to use an if block, so review the Fortran syntax from the Fortran primer if you need a refresher. Finally, to actually tell MESA to stop the evolution, you’ll need to set extras_finish_step = terminate in the if block. |
| Try compiling to debug, but don’t run the project yet. |
Hint: Conditionally Terminating the Run
Assuming you’ve defined a variable for the equilibrium temperature of the Earth (let’s call it T_earth_eq), you can check if it exceeds the value set in s% x_ctrl(1) like so:
if (T_eq_earth > s% x_ctrl(1)) then
    write(*,*) 'extras_finish_step: T_eq_earth =', T_eq_earth, '>', s% x_ctrl(1), 'K'
    write(*,*) 'extras_finish_step: terminating run'
    extras_finish_step = terminate
end if
Note that we can print multiple things in the same write statement by separating them with commas. This will print the message and the value of T_earth_eq on the same line.
Answer
The completed extras_finish_step function should look like this:
integer function extras_finish_step(id)
    integer, intent(in) :: id
    integer :: ierr
    type (star_info), pointer :: s
    real(dp) :: T_eq_earth
    ierr = 0
    call star_ptr(id, s, ierr)
    if (ierr /= 0) return
    extras_finish_step = keep_going

    T_eq_earth = s% Teff * (s% photosphere_R * Rsun / (2d0 * AU))**0.5
    write(*,*) 'Earth equilibrium temperature:', T_eq_earth

    if (T_eq_earth > s% x_ctrl(1)) then
        write(*,*) 'extras_finish_step: T_eq_earth =', T_eq_earth, '>', s% x_ctrl(1), 'K'
        write(*,*) 'extras_finish_step: terminating run'
        extras_finish_step = terminate
    end if

    if (extras_finish_step == terminate) s% termination_code = t_extras_finish_step
end function extras_finish_step
Highlighted are the new lines, namely the if block that checks the equilibrium temperature against the value set in x_ctrl(1), prints a message if the condition is met, and sets extras_finish_step = terminate to stop the evolution.
Now let’s test our new stopping condition. We’ll need to set the value of x_ctrl(1) in the inlist. We’ll set it to a pretty high value of 310 K, but this is too high to reach in the current model since it stops at core hydrogen depletion.
Caution
Note that within an inlist, the star info structure is nowhere to be found. You should not use s% within an inlist, EVER.. When accessing inlist values in run_star_extras.f90, you are querying the star info structure, so you do need to use s%. In short, you’ll just use x_ctrl(1) in the inlist, but s% x_ctrl(1) in your Fortran code.
| 📋 Task 3.5 |
|---|
Edit your inlist to set x_ctrl(1) to 310 K (these go in the controls namelist), and prevent the old stopping condition from functioning. |
| Then, compile and run the project again. It should run for about 126 timesteps before stopping if everything is working correctly. |
Answer
Assuming your run_star_extras.f90 file is set up correctly (see previous answer), your inlist_project should now have this section in it:
! EARLIER PARTS OMITTED FOR BREVITY
&controls
    ! OTHER CONTROLS SETTINGS OMITTED FOR BREVITY

    ! when to stop
    ! stop when the center mass fraction of h1 drops below this limit
    ! xa_central_lower_limit_species(1) = 'h1'
    ! xa_central_lower_limit(1) = 1d-2

    ! stop when earth equilibrium temperature exceeds this limit
    x_ctrl(1) = 310
Note that the old stopping condition is commented out. You could also just delete it. Note also that we don’t need to specify units for x_ctrl(1) (nor could we).
When the run terminates, you should see the message you included in the extras_finish_step function printed to the terminal, indicating that the temperature at Earth exceeded the value set in x_ctrl(1). If so, congratulations! You’ve successfully added a custom stopping condition to MESA.
Part 4: Adding Extra Physics
The stopping condition we just added is a simple one, and it doesn’t actually affect how the star evolves. It just tells MESA when to stop. However, we can also make dynamic changes to our model at various points in the evolution. A simple way is by changing inlist controls on the fly. For instance, we could decrease the resolution once total burning from carbon fusion exceeds some value.
Steps for Implementing a Hook
More interesting is adding new physics to the model. This is a bit more involved, but for the most part, this can be done in run_star_extras.f90, rather than hacking at MESA itself. We do this through so-called “hooks,” which are functions that MESA calls at specific points within the monolithic “take step” stage on the flowchart above. There are many of these hooks, so they are not included in the standard run_star_extras.f90 boilerplate.
Instead, we follow a multi-step process to implement a new hook:
- Copy and paste the boilerplate code for your hook from the appropriate file in
$MESA_DIR/star/other. - Rename the subroutine/function to something more meaningful.
- In
extras_controls, add a line to set the pointer to your new hook subroutine/function. - Turn on the hook in your inlist by setting the appropriate control to
.true.. - Actually implement the hook inside the currently empty subroutine/function, compile, debug, and run.
That sounds like a lot, but most of the work is just in step 5 where you actually implement the physics. The rest is just boilerplate or reading simple instructions in the template files.
As a toy model, we’ll use the other_energy hook to add some mysterious new energy source to our solar model, following all the steps in this process.
Step 1: Copy the Boilerplate
| 📋 Task 4.1 |
|---|
In your terminal, navigate to $MESA_DIR/star/other. Execute ls and peruse the various hooks available to you. |
Then, open other_energy.f90 and copy just the subroutine default_other_energy into your run_star_extras.f90 file. |
Hint: What all am I copying?
Within $MESA_DIR/star/other/other_energy.f90, copy all of this:
subroutine default_other_energy(id, ierr)
    use star_def
    use auto_diff
    use const_def, only: Rsun
    integer, intent(in) :: id
    integer, intent(out) :: ierr
    type (star_info), pointer :: s
    integer :: k
    ierr = 0
    call star_ptr(id, s, ierr)
    if (ierr /= 0) return
    !s% extra_heat(:) = s% extra_power_source
    ! note that extra_heat is type(auto_diff_real_star_order1) so includes partials.
end subroutine default_other_energy
Hint: Where should I paste this?
So long as the pasted subroutine is not inside another subroutine or function, it can go basically anywhere in run_star_extras.f90 below the contains keyword. I recommend putting it either just after the last function/subroutine (but before the end module run_star_extras line) or just after the extras_controls subroutine. This way, it will be easy to find later.
At this point, it’s a good idea change back into your work directory and try to recompile (./mk) to make sure you haven’t introduced any syntax errors in run_star_extras.f90. If you have, fix them before proceeding.
Step 2: Rename the Subroutine
Now that we have the boilerplate code, we need to rename the subroutine to something more meaningful. We’ll call it day2_other_energy. Before we make changes, let’s take a closer look at the boilerplate code we just copied:
subroutine default_other_energy(id, ierr)
    use star_def
    use auto_diff
    use const_def, only: Rsun
    integer, intent(in) :: id
    integer, intent(out) :: ierr
    type (star_info), pointer :: s
    integer :: k
    ierr = 0
    call star_ptr(id, s, ierr)
    if (ierr /= 0) return
    !s% extra_heat(:) = s% extra_power_source
    ! note that extra_heat is type(auto_diff_real_star_order1) so includes partials.
end subroutine default_other_energy
We see that it brings in a few other modules and defines some variables. There’s also an interesting commented out bit of code that is leftover from older versions of MESA. It does show a nifty Fortran trick, though; you can use the (:) syntax to refer to all elements of an array, so s% extra_heat(:) refers to all elements of the extra_heat array in the star info structure.
We won’t be doing that here, though, as we’ll want to set the value of extra_heat to a different value at every zone in the model, so we can safely delete that line as well as the comment afterward.
| 📋 Task 4.2 |
|---|
Rename the subroutine to day2_other_energy and delete the two comments at the end of the subroutine. Remember, the name appears at the beginning and the end of the subroutine! |
| Compile again to make sure you haven’t introduced any syntax errors. If you have, fix them before proceeding. |
Answer
The renamed subroutine should look like this:
subroutine day2_other_energy(id, ierr)
    use star_def
    use auto_diff
    use const_def, only: Rsun
    integer, intent(in) :: id
    integer, intent(out) :: ierr
    type (star_info), pointer :: s
    integer :: k
    ierr = 0
    call star_ptr(id, s, ierr)
    if (ierr /= 0) return
end subroutine day2_other_energy
Step 3: Set the Pointer
We have another step to complete before MESA will even call our new subroutine. Rather than spell it out for you, I’m going to lead you to some bread crumbs, but see the hints if you get stuck.
| 📋 Task 4.3 |
|---|
Back in the template file, $MESA_DIR/star/other/other_energy.f90, you’ll notice some comments below the copyright and license information but above the subroutine itself. Use these and any resources within to figure out how to set the pointer to your new subroutine in extras_controls. |
Hint: What Comments?
The comments I’m talking about are these:
! consult star/other/README for general usage instructions
! control name: use_other_energy = .true.
! procedure pointer: s% other_energy => my_routine
!
If you then read the README file in $MESA_DIR/star/other, you’ll see that there are some instructions similar to these. Right now, we’re dealing with step 2 in that file, which happens to use other_energy as an example!
Note: the standard procedure pointers are already set up in extras_controls, so you can use them as a guide for the appropriate syntax.
Answer
You need to edit extras_controls by adding the following line somewhere in the giant block of pointer statements:
s% other_energy => day2_other_energyThis sets the pointer s% other_energy to point to our new subroutine day2_other_energy. This is how MESA knows to call our subroutine when it reaches the other_energy hook in the flowchart. For me, the entirety of the extras_controls subroutine now looks like this:
subroutine extras_controls(id, ierr)
   integer, intent(in) :: id
   integer, intent(out) :: ierr
   type (star_info), pointer :: s
   ierr = 0
   call star_ptr(id, s, ierr)
   if (ierr /= 0) return

   ! this is the place to set any procedure pointers you want to change
   ! e.g., other_wind, other_mixing, other_energy  (see star_data.inc)


   ! the extras functions in this file will not be called
   ! unless you set their function pointers as done below.
   ! otherwise we use a null_ version which does nothing (except warn).

   s% extras_startup => extras_startup
   s% extras_start_step => extras_start_step
   s% extras_check_model => extras_check_model
   s% extras_finish_step => extras_finish_step
   s% extras_after_evolve => extras_after_evolve
   s% how_many_extra_history_columns => how_many_extra_history_columns
   s% data_for_extra_history_columns => data_for_extra_history_columns
   s% how_many_extra_profile_columns => how_many_extra_profile_columns
   s% data_for_extra_profile_columns => data_for_extra_profile_columns

   s% how_many_extra_history_header_items => how_many_extra_history_header_items
   s% data_for_extra_history_header_items => data_for_extra_history_header_items
   s% how_many_extra_profile_header_items => how_many_extra_profile_header_items
   s% data_for_extra_profile_header_items => data_for_extra_profile_header_items

   s% other_energy => day2_other_energy
end subroutine extras_controls
The highlighted line at the end is the only new addition.
Step 4: Turn the Hook On
You’re probably getting the hang of this by now, so I’ll let you try this one on your own again.
| 📋 Task 4.4 |
|---|
Return to the README and comments of the previous task and add a line to inlist_project that will turn on the other_energy hook. |
To test to see if it’s working, put a statement like write(*,*) 'other_energy hook called' in your day2_other_energy subroutine. |
| Compile and run the project again, and you should see this message printed to the terminal at every timestep. |
Answer
The line you need to add to your inlist_project file is:
use_other_energy = .true.This should go in the controls namelist, and it will turn on the other_energy hook.
Your day2_other_energy subroutine should now look like this:
subroutine day2_other_energy(id, ierr)
    ! BEGINNING OF SUBROUTINE OMITTED FOR BREVITY
    if (ierr /= 0) return
    write(*,*) 'other_energy hook called'
end subroutine day2_other_energy
When you compile and run the project, you should see the message other_energy hook called printed to the terminal at every timestep, indicating that your hook is being called correctly.
Step 5: Implement the Hook
So far, we have a hook that is called, but does nothing. Now let’s actually add the new energy source to the model. The way other_energy works is by changing the extra_heat array in the star info structure. This array is set to values of specific energy generation in erg/g/s at each zone in the model. The extra_heat array is of type auto_diff_real_star_order1, which means it can be used in the auto-differentiation framework that MESA uses to compute derivatives of the energy generation rate with respect to various parameters. We’re not going to delve into why that’s important, but that’s why the auto_diff module is used in the boilerplate code we copied earlier, and it’s also why this will differ a bit from similar subroutines from older releases of MESA.
First off, let’s do nothing again, but in a fancier way.
| 📋 Task 4.5 |
|---|
In your day2_other_energy subroutine, delete the write(*,*) statement we included earlier, and set the extra_heat array to a constant value of 0 by looping over all zones in the model. Fortran is 1-indexed, so your loop should start at 1 and go to s% nz (the number of zones in the model). |
Note: you could use the nifty (:) syntax, but the point of this is to get a loop working that we can do more interesting things with later, so use a do loop instead. |
| Compile and run the project again, and you should see no change in the model evolution, but you should see no errors either. |
Answer
The day2_other_energy subroutine should now look like this:
subroutine day2_other_energy(id, ierr)
    use star_def
    use auto_diff
    use const_def, only: Rsun
    integer, intent(in) :: id
    integer, intent(out) :: ierr
    type (star_info), pointer :: s
    integer :: k
    ierr = 0
    call star_ptr(id, s, ierr)
    if (ierr /= 0) return

    ! Set extra_heat to 0 at all zones
    do k = 1, s% nz
        s% extra_heat(k) = 0d0
    end do

end subroutine day2_other_energy
When you compile and run the project again, you should see no change in the model evolution, but you should also see no errors. The model should evolve as it did before, but now we have a hook that is doing something (even if it’s just setting the extra_heat array to zero).
Now let’s finally implement something that’s actually interesting! We’ll assume this magic new energy is distributed exponentially from the center as a function of the mass coordinate. That is, it’s strongest at the center and decreases exponentially outward. We’ll use this function:
where is the total luminosity from this new energy source, is the mass coordinate of the zone, and is a characteristic mass scale that determines how quickly the energy source decreases with increasing mass coordinate. Well-behaved values for and are and , respectively, but I encourage you to make these values user-accessible in the inlist so you can experiment with them later.
| 📋 Task 4.6 |
|---|
Implement the above energy source in your day2_other_energy subroutine. You should already have a loop ready to go, but now instead of setting each zone’s extra_heat to zero, you should compute the value locally for each zone. |
| As always, beware unit trickery! |
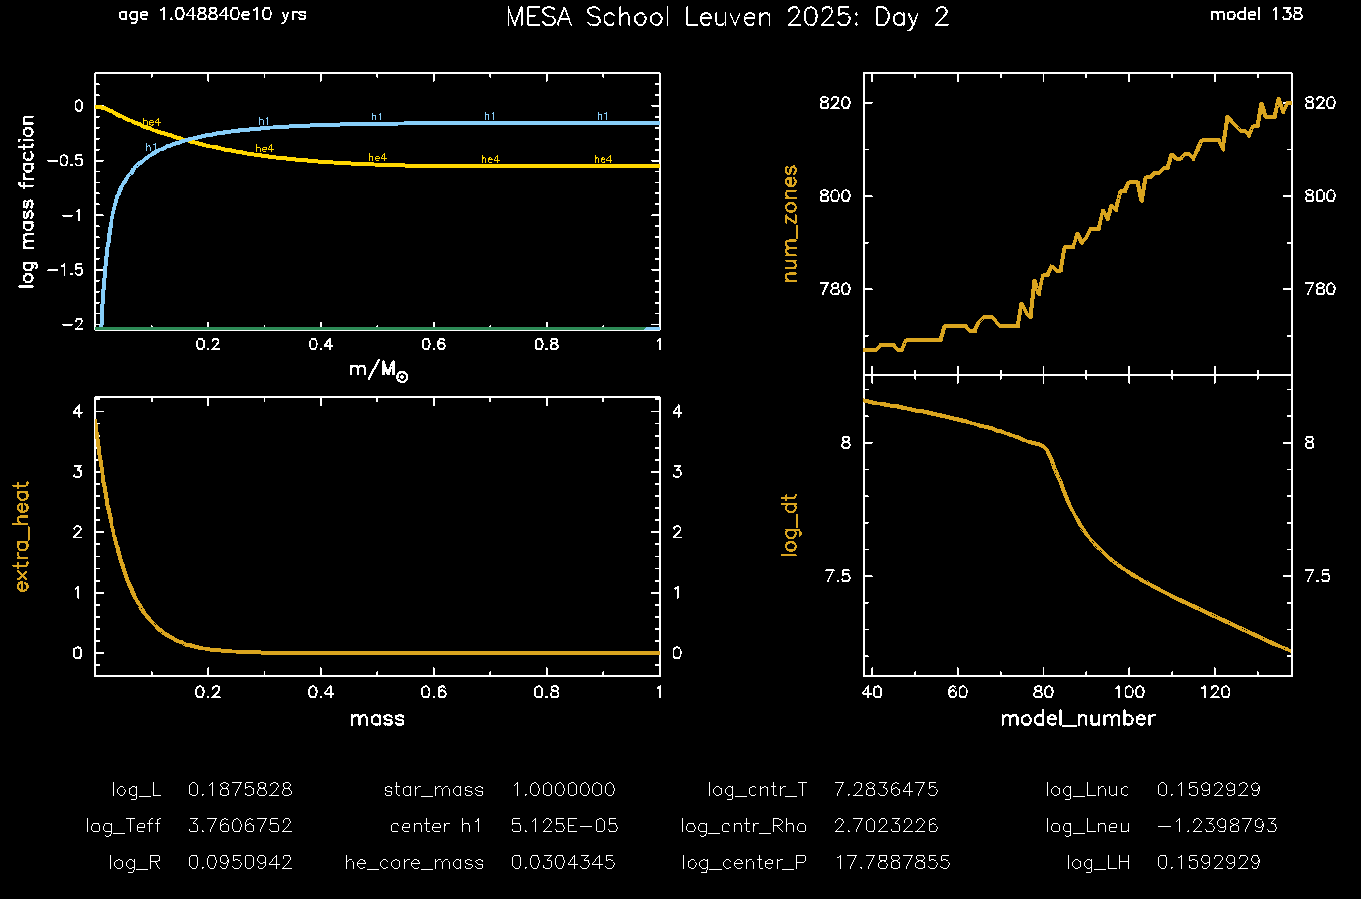
Compile, run, and check the plot that shows extra_energy to confirm that it is behaving appropriately. |
While it may take more timesteps than before, the actual evolutionary time of the model should be lower, since the added energy source will cause Earth to heat up more quickly.
Hint: Unit Trickery?
Okay, it’s not “trickery” per se, but s% extra_heat is in erg/g/s, and we tend to think of masses and luminosities in solar units. My recommendation is to not fight your instincts and just convert everything to cgs within the subroutine. So if you read in
and
in solar units, convert them to cgs units using Lsun and Msun (from the const module) before using them in the calculation.
Hint: The Mass Coordinate
The “mass coordinate” is the mass of the star enclosed within a zone. So at the center, it’s zero, and and at the surface, it’s the total mass of the star. In MESA, you can access this using s% m(k), where k is the zone index (1-indexed; probably your looping variable). Thankfully, this quantity is already in cgs units.
Answer
The final routine should look something like this
subroutine day2_other_energy(id, ierr)
    use star_def
    use auto_diff
    use const_def, only: Rsun
    integer, intent(in) :: id
    integer, intent(out) :: ierr
    type (star_info), pointer :: s
    integer :: k
    real(dp) :: delta_M, L_extra
    ierr = 0
    call star_ptr(id, s, ierr)
    if (ierr /= 0) return

    delta_M = s% x_ctrl(2) * Msun
    L_extra = s% x_ctrl(3) * Lsun

    do k = 1, s% nz
        s% extra_heat(k) = L_extra / delta_M * exp(-s% m(k) / delta_M)
    end do
end subroutine day2_other_energy
And your inlist_project should have the following lines somewhere in the controls namelist:
  x_ctrl(2) = 0.05d0
  x_ctrl(3) = 0.1d0
  use_other_energy = .true.
When all is done with
,
, and the cutoff equilibrium temperature set to 310 K, the last frame of your pgstar evolution should look like this:
Part 5: Bonus Exercise: Adding Custom Output Columns
If you got this far, you’ve done a great job! As a bonus exercise, let’s compare the extra heating to the nuclear energy generation rate in the star, both locally and globally.
| 📋 Task 5.1 |
|---|
Use the existing four functions and subroutines dealing with history and profile columns to add a new column to both history and profile outputs. The history column should be called L_ratio, and it should be the ratio of the total extra heating to the total nuclear power generation in the star. The profile column should be called eps_ratio, and it should be the ratio of the local extra heating to the local specific nuclear energy generation rate. |
| When you have it working, load the last profile and history files in MESA Explorer and plot these new columns against model number (history) and mass coordinate (profile). You’ll probably want to use a logarithmic scale for the y-axis of the profile plot. |
Hint: star info structure members
You’ll want to use the following member of the star info structure:
total_extra_heatingtotal_nuclear_heatingextra_heateps_nuc
Beware; extra_heat is of type auto_diff_real_star_order1, so you’ll need to use the val member (extra_heat(k)% val) to get the actual value of the extra heating at each zone. auto_diff is a great tool, but sometimes these gotchas can trip you up if you’re not careful (I wasn’t at first!).
Answer
The four functions and subroutines you need to implement are:
integer function how_many_extra_history_columns(id)
   integer, intent(in) :: id
   integer :: ierr
   type (star_info), pointer :: s
   ierr = 0
   call star_ptr(id, s, ierr)
   if (ierr /= 0) return
   how_many_extra_history_columns = 1
end function how_many_extra_history_columns


subroutine data_for_extra_history_columns(id, n, names, vals, ierr)
   integer, intent(in) :: id, n
   character (len=maxlen_history_column_name) :: names(n)
   real(dp) :: vals(n)
   integer, intent(out) :: ierr
   type (star_info), pointer :: s
   ierr = 0
   call star_ptr(id, s, ierr)
   if (ierr /= 0) return

   ! note: do NOT add the extras names to history_columns.list
   ! the history_columns.list is only for the built-in history column options.
   ! it must not include the new column names you are adding here.
   names(1) = 'L_ratio'
   vals(1) = s% total_extra_heating / (s% total_nuclear_heating)

end subroutine data_for_extra_history_columns


integer function how_many_extra_profile_columns(id)
   integer, intent(in) :: id
   integer :: ierr
   type (star_info), pointer :: s
   ierr = 0
   call star_ptr(id, s, ierr)
   if (ierr /= 0) return
   how_many_extra_profile_columns = 1
end function how_many_extra_profile_columns


subroutine data_for_extra_profile_columns(id, n, nz, names, vals, ierr)
   integer, intent(in) :: id, n, nz
   character (len=maxlen_profile_column_name) :: names(n)
   real(dp) :: vals(nz,n)
   integer, intent(out) :: ierr
   type (star_info), pointer :: s
   integer :: k
   ierr = 0
   call star_ptr(id, s, ierr)
   if (ierr /= 0) return

   ! note: do NOT add the extra names to profile_columns.list
   ! the profile_columns.list is only for the built-in profile column options.
   ! it must not include the new column names you are adding here.

   names(1) = 'eps_ratio'
   do k = 1, nz
      vals(k,1) = s% extra_heat(k)% val / s% eps_nuc(k)
   end do

end subroutine data_for_extra_profile_columns
Note that most of this was boilerplate. We needed to set two integers (in the how_many_extra_* functions) to 1 instead of 0, and then we needed to set the names and values in the data_for_extra_* subroutines. For the profile case, we had to do a loop to set the value of the ratio for each zone, and since extra_heat is of type auto_diff_real_star_order1, we had to use the val member to get the actual value of the extra heating at each zone.
After re-running the model and uploading the output to MESA Explorer, here’s what we get. First, the history plot of the ratio of total extra heating to total nuclear heating:
 And then the profile plot of the ratio of local extra heating to local nuclear energy generation:
 You can see that this blows up at the outer edge of the star, presumably because the nuclear energy generate rate drops off much faster than the extra heating exponential decay, causing the ratio to diverge.
Conclusion and Next Steps
Congratulations! Though these examples were relatively simple, these building blocks are the same one used to implement more complex physics in MESA. I do want to mention a few more things before we wrap up.
- Additional Output (see bonus exercise): If you want to output additional data to the history or profile files, you can do so by implementing the
how_many_extra_history_columns,data_for_extra_history_columns,how_many_extra_profile_columns, anddata_for_extra_profile_columnsfunctions. These functions are called at the end of each timestep and allow you to add custom data to the output files. Note that you have to set the number of new columns in one function, and then that number is used in the other function to size the arrays that need to be set. You do not need to add these column names tohistory_columns.listorprofile_columns.list. - Calling Functions: Take a look in
$MESA_DIR/star/public/star_lib.f90. This file exposes a bunch of functions that you can call from yourrun_star_extras.f90file ifstar_libis imported with ausestatement. For instance, you can callstar_relax_massto change the mass of a star dynamically right in the middle of a run without having to switch to a new inlist. - Saving Local Variables: You can declare module-level variables (available across functions and subroutines) in
run_star_extras.f90, but be careful with this, because they are not automatically saved when a photo is saved. You can add this feature by using theother_photo_readandother_photo_writehooks. These are [currently] not well documented, but see therun_star_extras.f90file of the$MESA_DIR/star/test_suite/c13_pockettest case to see how module level variables can be declared, used, and stored in photos using these hooks. - More Hooks and Examples: In the spirit of the last point, you saw that there are many hooks available in MESA. Each one works a bit differently, and their documentation is not always clear. A good way to learn how to use them is to look at the test cases in
$MESA_DIR/star/test_suite. Not every hook is tested, but many are, so you can see how they are used in practice. For a real tour de force of what you can do withrun_star_extras.f90, check out theppisntest case.
Have fun exploring what you can do with MESA! And when you really do get stuck, you can always send an email to the MESA users mailing list to see if a new pair of eyes can help you out. Just be sure to include a description of what you’re trying to do, what you’ve tried, and any relevant code files. The MESA community is generally very helpful and responsive.